Adding expires headers in WordPress can remarkably improve the website performance. They can reduce the server load, save bandwidth, fasten page loading time, and optimize user experience.
Due to all these reasons, the usage of expires headers has increased significantly over time. You can also add expires headers easily to your website. However, no worries if you yet don’t know what expires headers are and how to add them to your website.
This article will provide you with a thorough guide on how to add expires headers in WordPress in easy ways. Get started!
What are Expires Headers?
Expires headers are also known as cache expiration headers. They provide instructions to web browsers, caching proxies, and other intermediaries specifying the caching duration of static resources like images, stylesheets, and scripts.
According to the instructions, web browsers will showcase the content of particular web pages when users request them. When the specified duration expires, the cached memories are automatically cleared, and new cache memory is generated so users access the resources again.
This mechanism improves a website’s performance by reducing the need to fetch resources from the original web server every time visitors request them.
How to Add Expires Headers in WordPress
There are several ways to add expires headers in WordPress. We’ll cover their most popular methods so you can choose the one easy for you.
Method 01: Add Expires Headers Using a Plugin
Most of the WordPress cache plugins offer a user-friendly way to configure the expires headers settings. W3 Total Cache is a great plugin to do this.
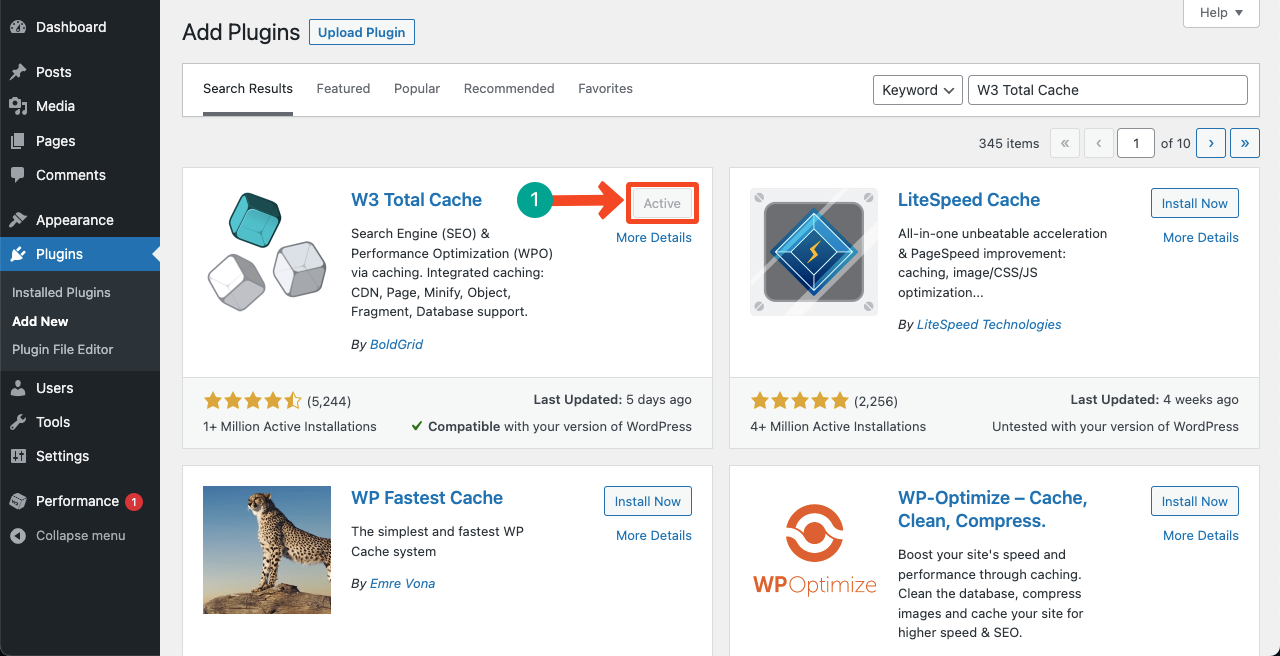
Go to Plugins > Add New. Find the W3 Total Cache plugin by typing its name in the search box. Install and activate it once the plugin appears below.
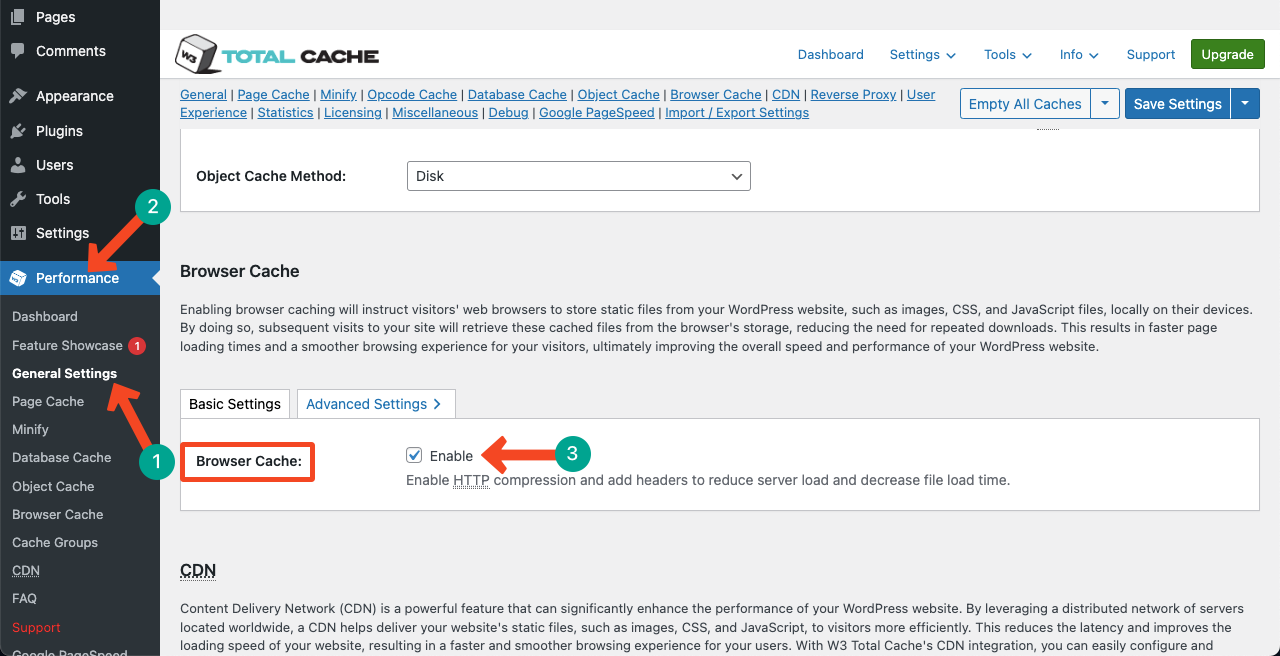
Once the plugin is activated, you’ll see a new menu named Performance has been created on the admin bar. Navigate to Performance > General Settings.
Come to the section Browser Cache by scrolling the page. Enable it by giving a tick mark to the check box.
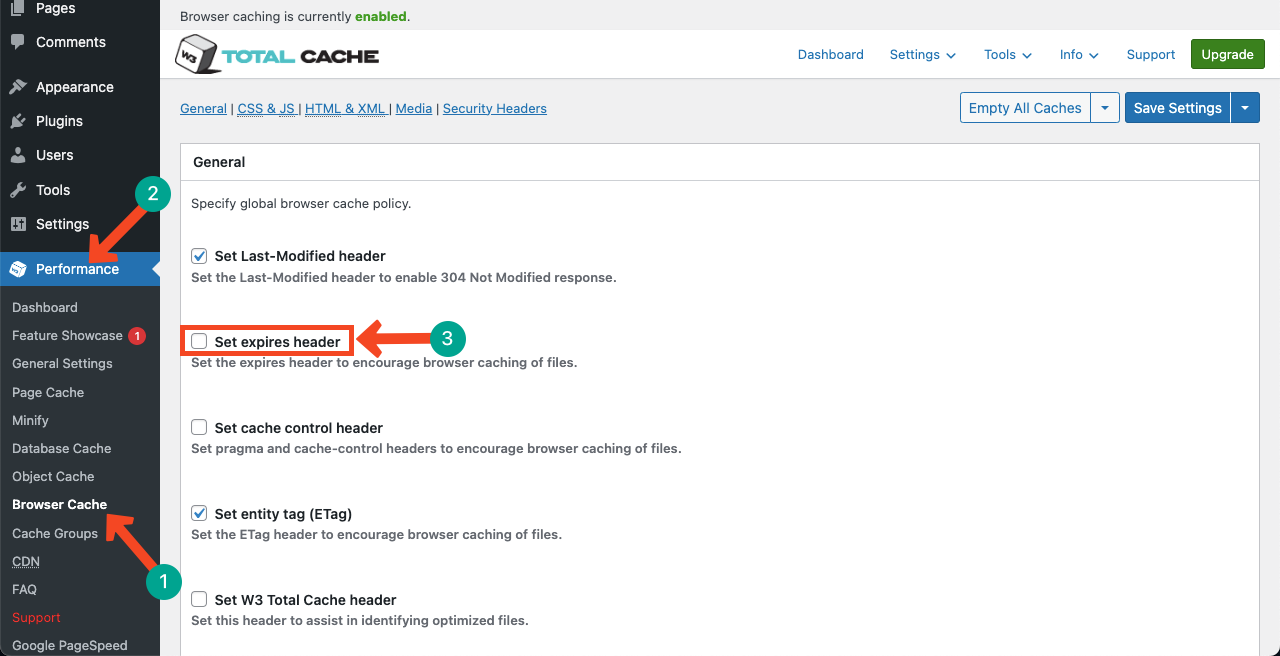
After that, go to Performance > Browser Cache. Keep scrolling the page. You’ll find the Set expires header on multiple sections on the page.
For example, you can see the option in the General section. There are some more sections on the page like CSS & JS, HTML & XML, Media & Other Files, etc.
Tick mark the option Set expires header on every section. Finally, hit the Save Settings button.
This way, you can also add expires headers to your WordPress site easily using the W3 Total Cache plugin.
Method 02: Add Expires Headers Using the .htaccess File
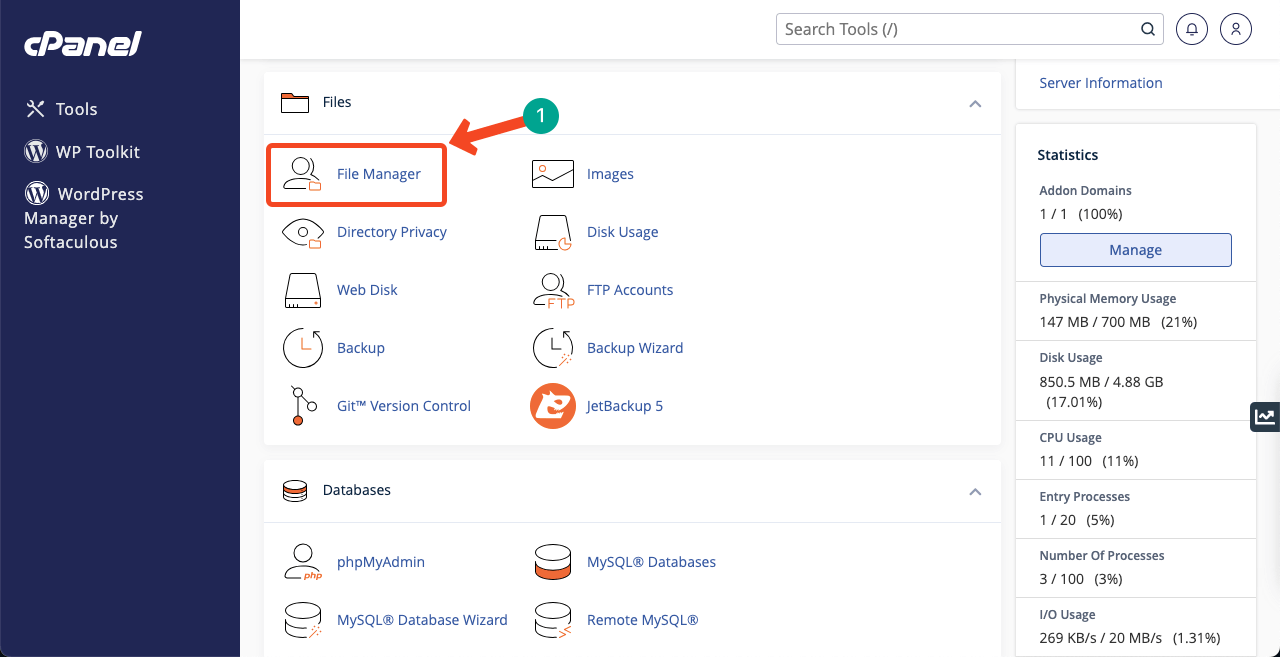
The .htaccess is a configuration file for the Apache web server. First, log into your cPanel using your valid credentials. Locate the File Manager and click on it.
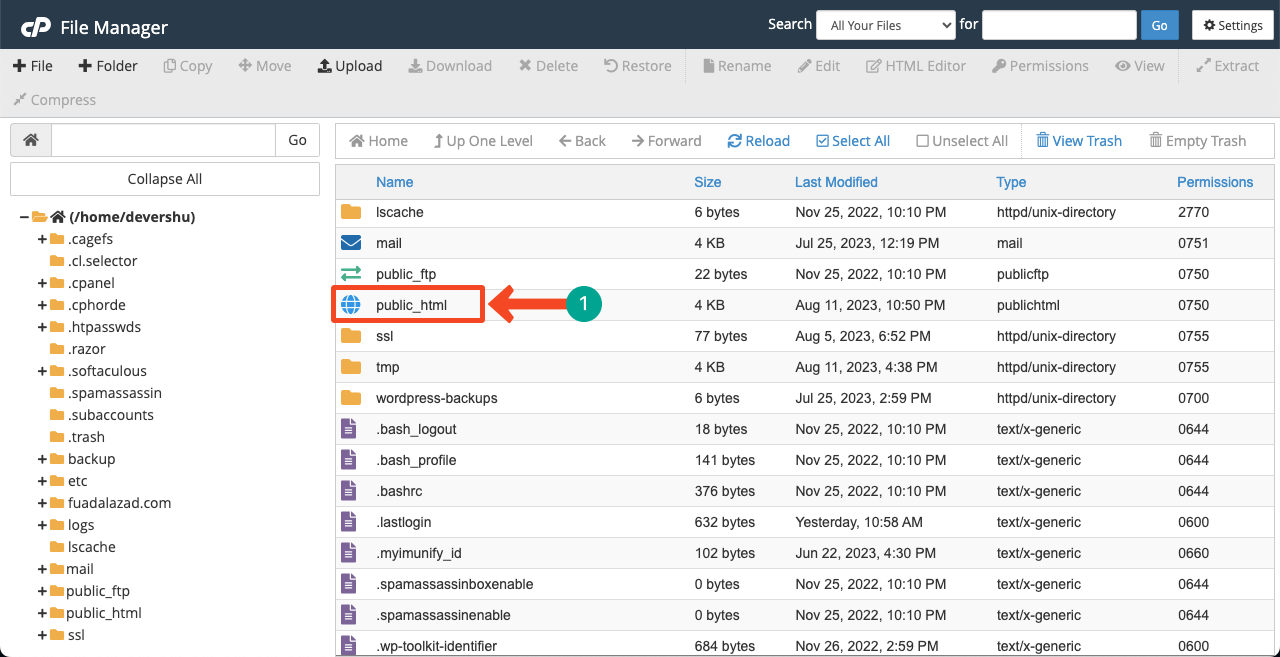
Find public_html. Double-click on it to open the file.
Find the .htaccess file. Right-click and select the edit option from the list.

Type the following codes in the editor page and hit the Save Changes button at the end.
ExpiresActive On
# Images
ExpiresByType image/jpeg “access plus 1 year”
ExpiresByType image/gif “access plus 1 year”
ExpiresByType image/png “access plus 1 year”
ExpiresByType image/webp “access plus 1 year”
ExpiresByType image/svg+xml “access plus 1 year”
ExpiresByType image/x-icon “access plus 1 year”
# Videos
ExpiresByType video/mp4 “access plus 1 year”
ExpiresByType video/mpeg “access plus 1 year”
# CSS, JavaScript
ExpiresByType text/css “access plus 1 month”
ExpiresByType text/javascript “access plus 1 month”
ExpiresByType application/javascript “access plus 1 month”
# Others
ExpiresByType application/pdf “access plus 1 month”
ExpiresByType application/x-shockwave-flash “access plus 1 month”
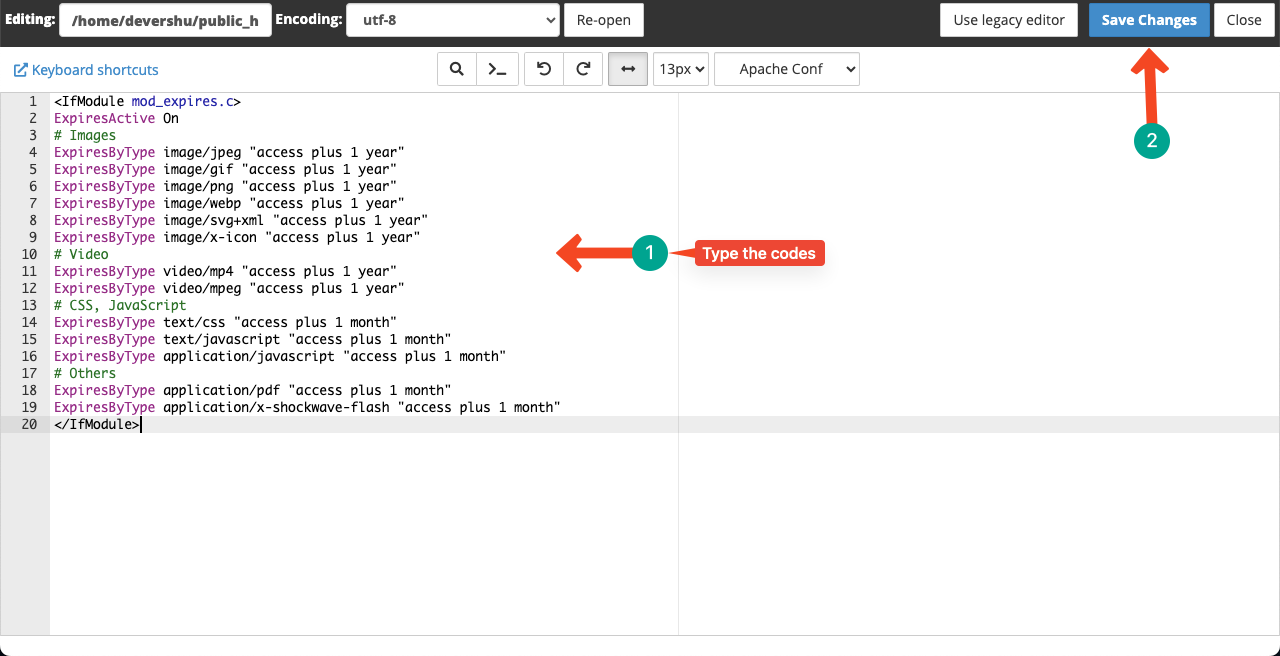
Thus, you can add expires headers to your WordPress site manually.
Method 03: Add Expires Headers to Nginx Server
The process we have described above is mainly for the Apache server. But if your website is hosted on the Nginx server, the process of adding expires headers will be different. You won’t find any .htaccess file in this method.
Nginx has a different configuration file for that. We request you ask your hosting provider to guide you to the file. Once you find the file, open it and copy-paste the following codes to it.
location ~* .(jpg|jpeg|gif|png)$ {
expires 365d;
}
location ~* .(pdf|css|html|js|swf)$ {
expires 2d;
}
You may change the value (365d and 2d) as you wish. Save the file after that.
Conclusion
Hope you were able to easily add Expires Headers to your WordPress site by following the above methods. But if you are a beginner and don’t have advanced knowledge about WordPress, we recommend you go with the third method.
Plus, before touching any file on cPanel, we also recommend you keep a backup of your site. Because every file on cPanel is very sensitive. The backup will help recover your site if you face any accidents.
Leave a Reply