The Default WordPress htaccess file is the one used by WordPress to store settings and manage server requests.
You will be appropriately guided through the easiest methods to learn How to Create the Default WordPress htaccess File. Moreover, this post will also help you know more about the .htaccess File.
What is the .htaccess File?
.htaccess is a default web server configuration format. You may know with editing .htaccess to allow or revoke Web site tools if you are familiar with Apache.
The .htaccess file is a core WordPress file to reset Apache Web Server-related settings. This file allows you to deactivate or enable those server features.
Also, the WordPress security settings can be managed via the .htaccess file. You will use it to set rights, customize password protection, and block spambots for specific files.
You will find the .htaccess file in your root directory after installing WordPress on the Apache webserver. This file is usually hidden. However, it has the option of displaying hidden files. In certain unusual cases, the Default WordPress htaccess might not be included in your WordPress installation. Fortunately, you may use your hosting panel to build the standard .htaccess file manually.
How to Create the Default WordPress htaccess File
In some instances, WordPress does not build or unintentionally delete the default .htaccess file. To see the file list, navigate to the public HTML folder. Ensure that the system has been configured to display hidden files. Here are furthermore steps you need to follow:
- First, log in to your cPanel Dashboard.
- On the upper-left corner, you will see the “+File” Button. Use that button to create a new file.
- Name the file as “.htaccess”.
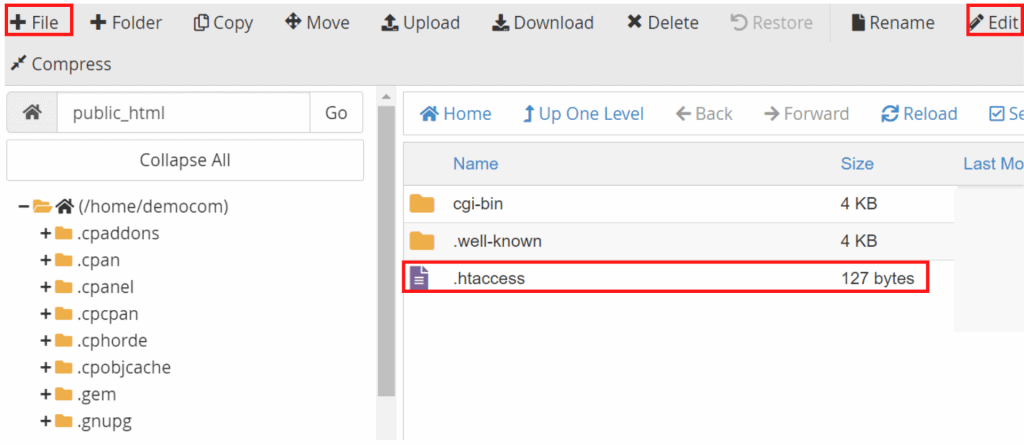
- Now click on the “.htaccess” File and choose the “Edit” option.
- Then paste the following code inside the file.
BEGIN WordPress
 RewriteEngine On
 RewriteBase /
 RewriteRule ^index.php$ - [L]
 RewriteCond %{REQUEST_FILENAME} !-f
 RewriteCond %{REQUEST_FILENAME} !-d
 RewriteRule . /index.php [L]
 END WordPress
- Finally, Click “Save” to save your changes.
Sum Up
The .htaccess can allow or deactivate several server features, including URL redirection, server signature, file caching, password security, and custom error pages.
Anyways, we hope this detailed guide helped you to understand How to Create the Default WordPress htacces File. And for the visitor who asked us to write an article on How to Add Search Box in WordPress Header. We have a dedicated article on this.
If you enjoyed this post, subscribe to our WordPress video tutorials on YouTube Channel. Remember to follow us on Pinterest.
We accept any type of suggestions from the visitors because it always motivates us to improve. Feel free to comment below.