You will be ready to connect goods to WooCommerce to sell your clients after you have progressed through the WooCommerce setup wizard. You are indeed here searching the easiest methods to learn How to Add Products in WooCommerce.
WooCommerce is one of the WordPress plugins which are most common and extensively used. One of the reasons is that it is very convenient with WooCommerce to run a profitable online store.
Adding WooCommerce goods is something anybody can do, even though you haven’t previously used WordPress. However, you might also want to help build your first product, the key focus of that post.
WooCommerce Products
First, we have to understand what a product is and what are its principal components. WooCommerce product can be any object which you sell in an internet shop, physically or digitally. Also, some specific features discriminate between blog entries and other pages on a WordPress platform.
There are many details attached to WooCommerce’s products, including photos, title, the image feature, summary, price, updates, stock, etc.
There are also various types of products. These are logos added to the items that describe how they are handled when selling, so both buyers and owners can be much happier.
WooCommerce Products Types
Here are the types to WooCommerce Products Types listed below:
- Simple products: That’s the most straightforward, classic, most popular form of the product. It is a physical item that can be delivered to the customer.
- Variable products: These include the variations of commodity size, colour, price, stock option, etc. For instance: A wallet in black and white.
- Grouped products: Two or more basic products are grouped products. It’s a sort of set of things that you can buy together, such as a purse and a wallet, that are mutually linked. In this case, there will be a connection on the product page for each of the individual products in the category.
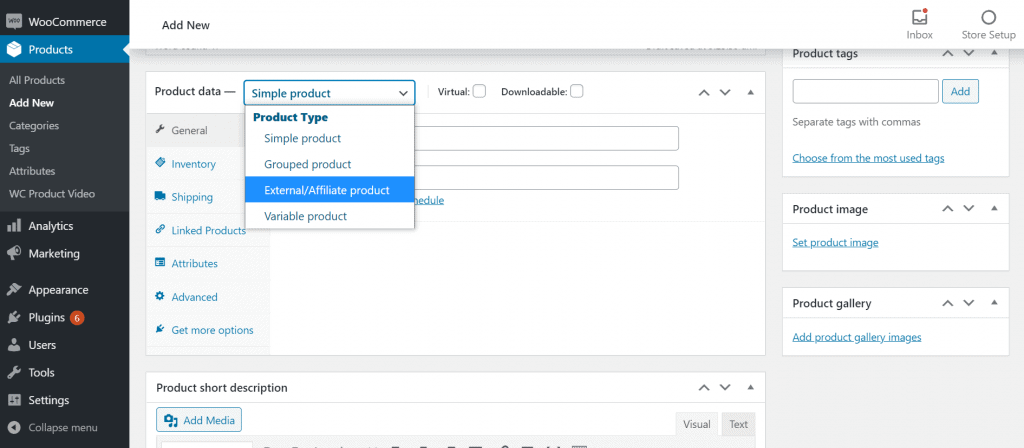
- External/affiliate products: These products are not accessible from your website but are described on your product pages with details and a link for the seller.
- Virtual products: Some goods are not delivered and are typically made up of a service. To make this type of product, some delivery options and features must be deactivated. This includes measurements, calculator prices, etc.
- Downloadable products: As the name means, this can be downloaded. The products downloadable allow additional fields in which a downloadable file may be added to the package. This helps customers with the order notification e-mail to get a download page. It is suitable to supply a file, including e-books, photo galleries, apps, etc.
How to Add Products in WooCommerce
We will teach you all approaches step-by-step in this guide. Below is a content index such that you can go straight to the segment in which you can learn How to Add Products in WooCommerce.
The WooCommerce admin panel has various uploading options. Any strategy has pros and cons and, depending on the situation, can be more or less relaxed. Any of them will help you add items to your online shop, regardless of the one you choose.
Here are the steps you need to follow:
Step 1: Create a WooCommerce Product
Login to your WordPress dashboard .
Now, navigate to WooCommerce >> Products after installing WooCommerce. To create the first product, press the Create Product tab.
The WordPress editor that you already know should be launched. But there are some new additions.The WordPress editor that you already know should be launched. But there are some new additions.
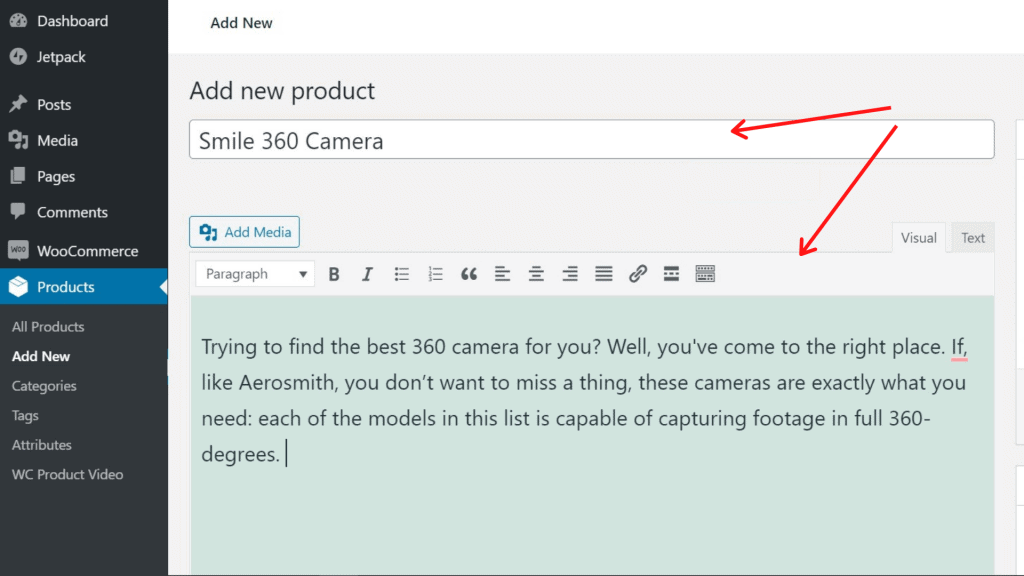
Step 2: Add product title and description
In the title segment, insert the name of the commodity. Next, fill up the product summary. You would like to illustrate a commodity’s benefits with an overview (more precisely, a lengthy description). The readability of this section can also be increased using bullet points.
Make sure they are designed for organic keywords when writing the title and definition.
Step 3: Choose product type
WooCommerce helps you to use multiple product styles, depending on what you sell. From main product types, you can pick the favorable type.
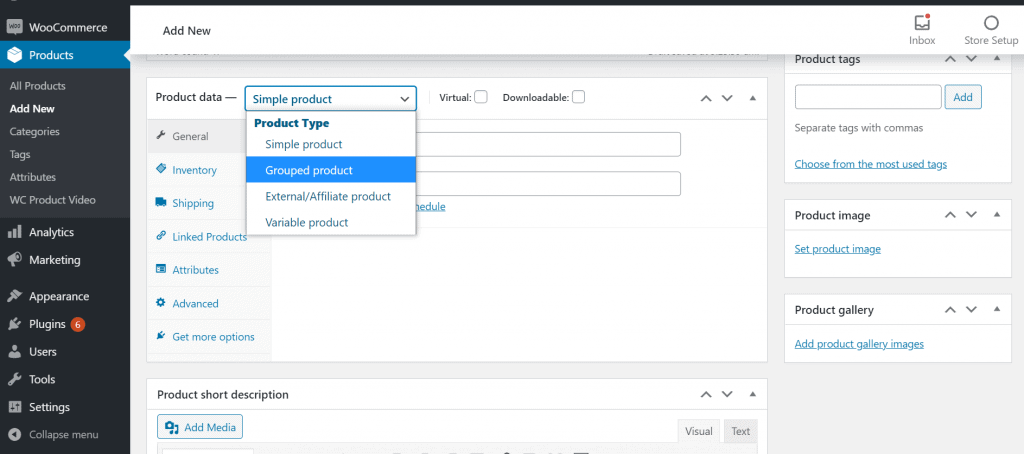
You should use the drop-down and checkboxes in the Product Data box to make this choice, which appears just below the WordPress editor.
Step 4: Fill out the product data meta box
You need to complete all the information in the product data box until you have chosen your product type. You will move through various parts with the tabs.
General Tab
You must insert the relevant product details in the general tab, which is the default tab of this meta box.
Initially, pick the product type: simple, variable, grouped, or external, and if it’s virtual or downloadable.
Then, if you give a discount, set a price and lower price.
Inventory
Likewise, you can control the stock in the inventory section. You can customize product availability and other configurations such as single shopping, backorders, or low stock warnings.
Shipping
In the shipping section, you can save more detail on the product. For physical items, this section is relevant as you can enter the weight and dimensional data. This data is seen on some product pages and in the backend.
Attributes
This section will describe attributes such as color, size, and so on for your products. These are used as filters on your website or vector items.
Advanced
On the Advanced tab, after ordering a product, you can add a message to your clients, specify a custom order and allow ratings for the items on the menu location for your product.
Note that several plugin and themes also show their meta boxes, so that besides those included by default, you can get more meta boxes here.
Step 5: Save the Product
You can simply save the changes by Clicking “Publish.”
If you are there to edit the product, you can click “Update” in order to save your addition.
Sum Up
You must configure and optimize all the items in your online shop. You can also build and add vouchers to boost your revenue. We also recommend that you take steps to avoid spam or counterfeit orders, which risk losing a lot of money.
Huge congratulations, I hope that this post will help you learn How to Add Products in WooCommerce. Besides, some visitors also asked us How to Delete a Category in WordPress. Do check the article.
If you enjoyed this post, subscribe to our WordPress video tutorials on YouTube Channel. Remember to follow us on Pinterest.
We accept any type of suggestions from the visitors because it always motivates us to improve. Feel free to comment below.