Tracking your WooCommerce stats with Google Analytics is a great way to track your conversions and goals. This article will guide you through the easiest method to learn How to Install Enhanced Ecommerce to WordPress.
Using enhanced e-commerce WooCommerce tracking, you can watch even the most minor interactions, like how many users can read your product stats, add items to their carts, and even how many consumers exit their carts without buying something.
What is Enhanced eCommerce?
Improved eCommerce is a Google Analytics plugin. It attempts to give the clients and potential guests a clearer understanding of their shopping behaviour.
Why Do We Need Enhanced eCommerce?
Compared to the traditional eCommerce implementation, enhanced eCommerce is more beneficial. The most significant advantage is that you can access different reports and even build segments depending on incidents.
Enhanced eCommerce, with 10 forms of reports targeted at critical insight and customer behavior monitoring, enables organizational assessments and company owners’ production.
It is easy to gather deep insights now, but it is challenging to be so essential without solid programming knowledge. Enhanced eCommerce has been able to access several reports, but you must code them for the same reason to document every detail. However, it does not seem simple and easy to customize the default code snippets on different pages.
What is customer tracking?
First and foremost, let us dispel all derogatory connotations associated with the word “customer monitoring.” It’s a method used by most large websites to determine what works and what doesn’t on their pages. The stakes are much higher in e-commerce because money is continually changing hands.
The word can be intrusive, so long as you don’t store any personally identifiable information regarding the users – and most sites don’t. Furthermore, when it comes to surveillance, the advantages significantly outweigh the drawbacks.
How to Install Enhanced Ecommerce to WordPress?
Integrate Enhanced Ecommerce in Google Analytics by following these four basic moves:
Step 1: Enable Enhanced Ecommerce Tracking in Google Analytics
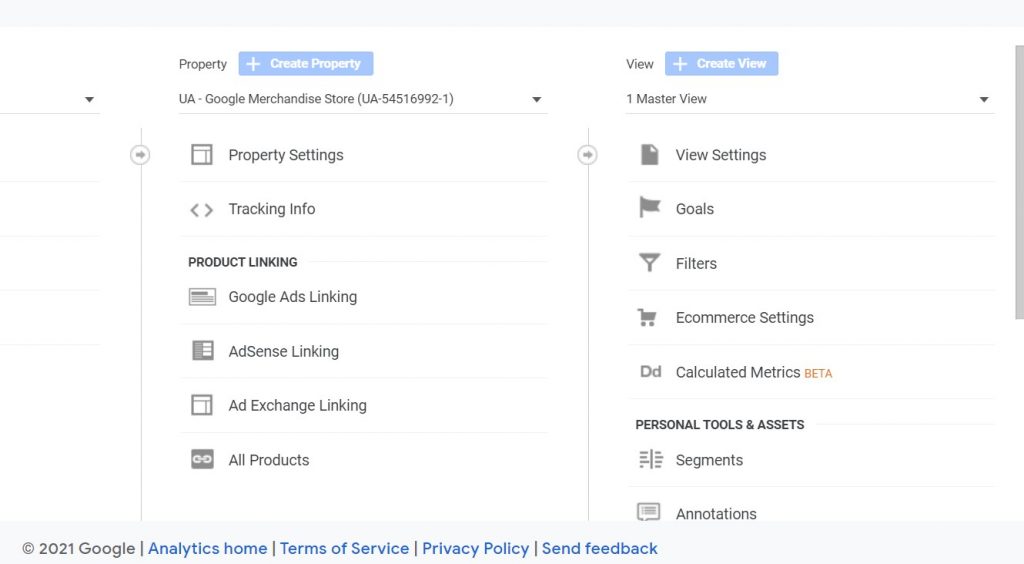
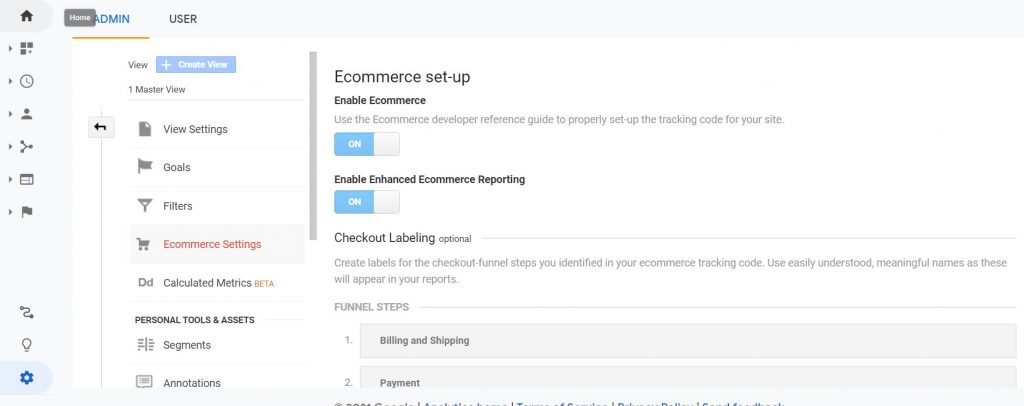
It will help if you visit the Google Analytics Admin tab to allow this feature. Look for the Ecommerce Settings section while you’re there:
Switch on Enable Ecommerce Option.
Also, Don’t forget to Turn On Enable Enhanced Ecommerce Reporting.
At the end of the page, click on Done.
Step 2: Install and Active the Enhanced Ecommerce Google Analytics plugin
To do this, the Enhanced Ecommerce Google Analytics plugin must be installed and activated on your site. Be aware that this particular plugin operates only if WooCommerce is already installed.
Here are the following steps you need to follow:
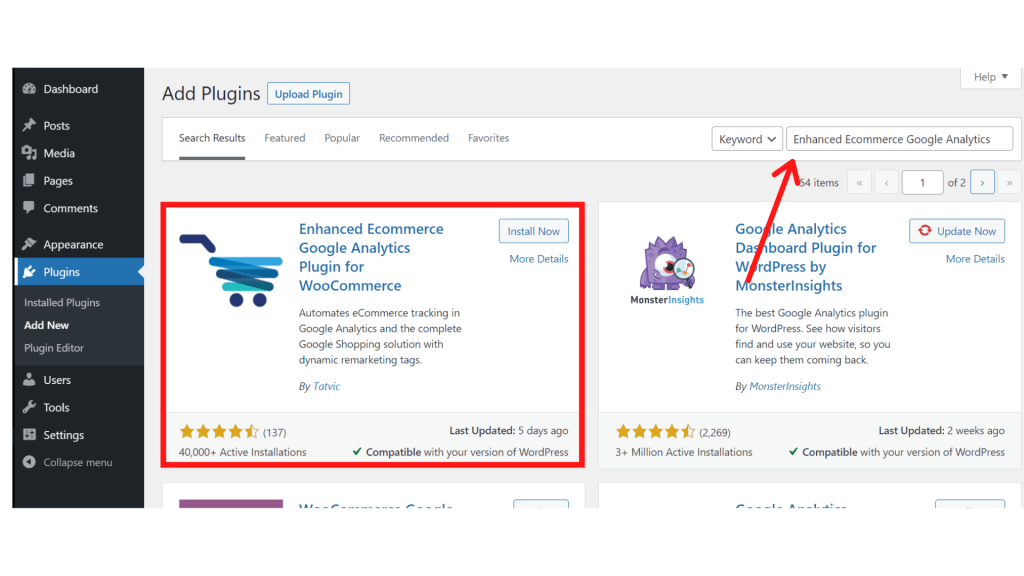
- Search for “Enhanced Ecommerce Google Analytics Plugin for WooCommerce.” Then Install and Active it.
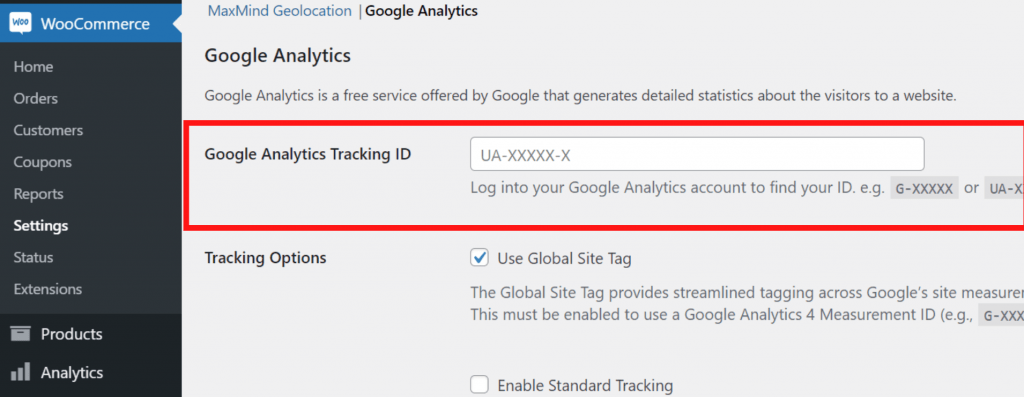
Now, You should navigate to WooCommerce >> Settings >> Integration. Look for the area that reads and attaches your Google Analytics ID. Here’s how you will find it.
Scroll down to the find Enhanced Ecommerce Tracking Code option, and turn it on.

Now the plugin begins to track all your WooCommerce Basic things, including product impressions, clicks, and when someone adds or removes it from a cart, etc., automatically. Please note that the plugin does not provide some items like subscriptions out of a box. If you are up to this feature, you can apply this manually or evaluate the plugin’s premium edition, which supports more specialized items and forms of reports.
Step 3: Check the latest Google Analytics metrics
Back to Google Analytics and open the Conversion tab. You should open it. Some new additions include shopping behaviour, checkout behaviour, product performance, and sales performance.
Shopping Behavior goals to give you a bird’s eye view of your store’s success. It displays shopping operation, items attached to carts, and the number of customers who left the site during the checkout process:
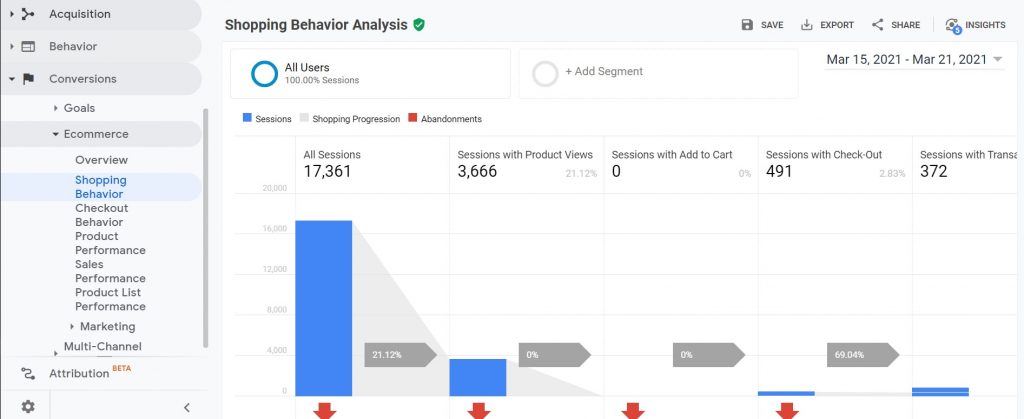
Keep in mind that you won’t see any activity if you just activated Enhanced Ecommerce tracking.
The Checkout Behavior column, on the other hand, gives you more detail about checkout abandonment. When you pick it, you’ll be able to see how many people are leaving at each point of the process:
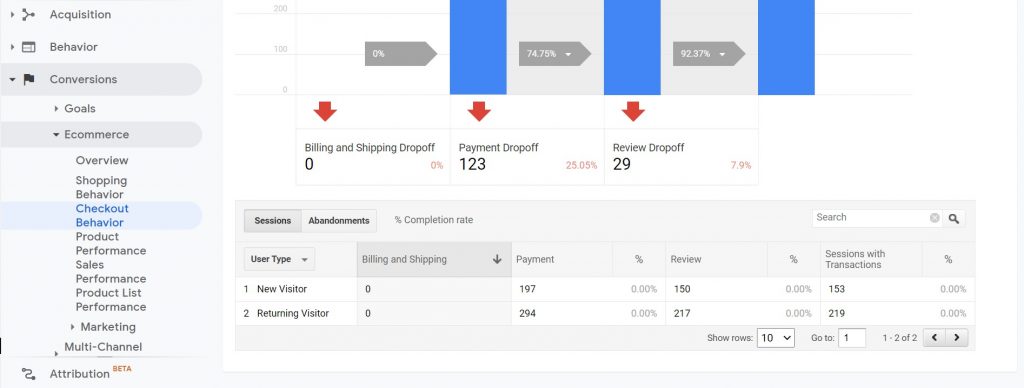
Next, one of the fascinating aspects of Google Analytics is the Product Performance portion. It allows you to monitor your returns, keep track of sales, and review your overall revenue for a particular product over a fixed period:
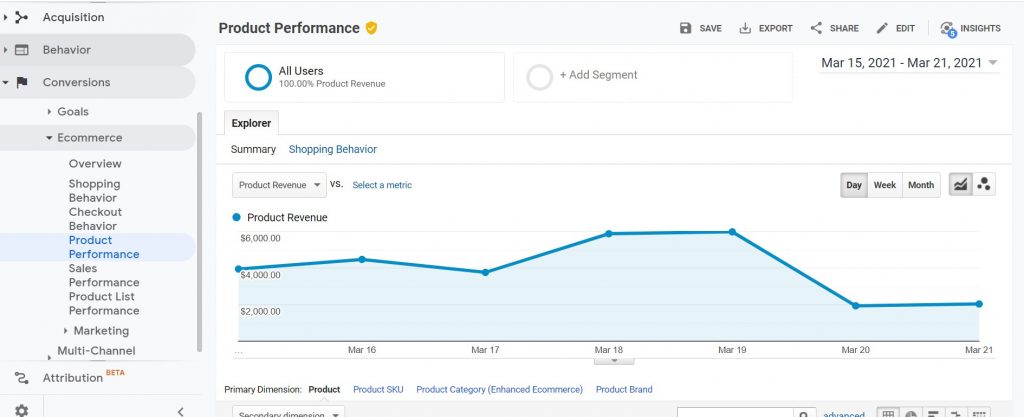
Finally, the Sales Performance tab deals with sales details, such as gross earnings, how much of it goes to taxes and delivery expenses, and how much you’ve paid in refunds.
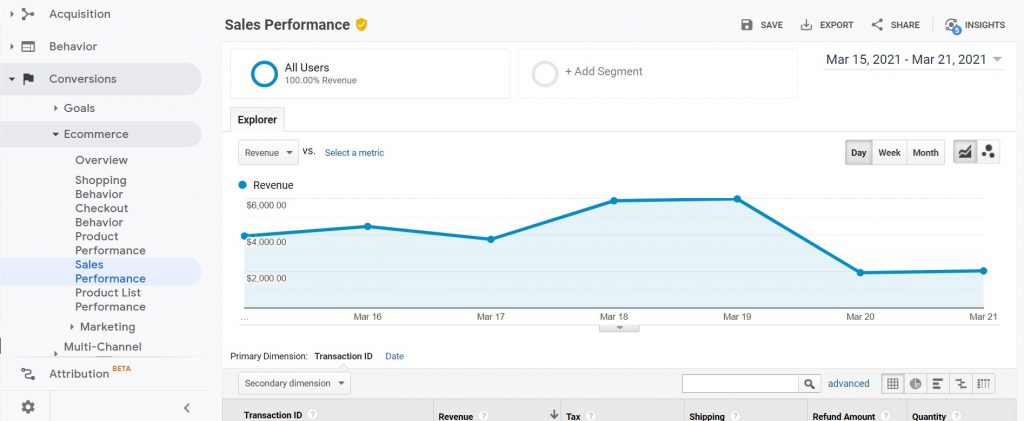
Each of these sections provides valuable information about the health of your company. However, you should pay careful attention to the segment on Checkout Conduct. It’s normal for some customers to leave the checkout phase in the center, so if you have unusually high abandonment rates, there might be a problem with your checkout screens.
Sum Up
Tracking the customers isn’t an intrusive procedure. Furthermore, the information it provides is critical for making informed decisions and optimizing your WooCommerce shop. Using Enhanced Ecommerce Tracking in Google Analytics, you’ll be able to get a closer look at your customer’s actions.
To summarize, WooCommerce is quick to set up and customize. We’ve gone through different steps to Install Enhanced Ecommerce to WordPress.
- Step 1: Enable Enhanced Ecommerce Tracking in Google Analytics.
- Step 2: Install and Active the Enhanced Ecommerce Google Analytics plugin.
- Step 3: Check the latest Google Analytics metrics
Anyways, we hope this detailed guide helped you to understand How to Install Enhanced Ecommerce to WordPress. And for the visitor who asked us to write an article on How to Add Products in WooCommerce. We have a dedicated article on this.
If you enjoyed this post, subscribe to our WordPress video tutorials on YouTube Channel. Remember to follow us on Pinterest.
We accept any type of suggestions from the visitors because it always motivates us to improve. Feel free to comment below.
