WooCommerce Shipping Classes are a handy function, such that shipping requirements can be applied to particular goods. In this article, you would learn everything about WooCommerce Shipping Classes, How To Set Up WooCommerce Shipping Classes, and so on.
What are WooCommerce Shipping Classes?
In general, shipping classes are a simple means of mixing identical goods. Thus, the products are subject to the same set of rules.
You run a store, for example, which sells t-shirts, scarves, and slices of vintage. The T-shirt and scarfs are now effortless. The shoes are more extensive and cost the customer more.
So, of course, the delivery rates for your shoes are higher. Join Shipping Classes.
You can develop an individual shipping class known as ‘shoes’ or ‘bulky stuff.’ To the level, you introduce all of the accessories. And then, for this shipping class, you set a higher price.
Different Examples of WooCommerce Shipping Classes
- Bulky Items: Any items such as a sofa or lounge chair can have an excess delivery fee if you sell the furniture. These all items fall under Bulky Items.
- Lightweight items: Put another way, certain goods can fit in an envelope and do not need a package such that they have a particular transport class and can hold cheaper delivery charges.
- Fragile items: Some items can be delicate, say pottery, and require a bubble covering and an additional large case to protect it.
- Specific packaging: You may sell posters or works of art, and certain items must be delivered in a poster tube. These sorts of the thing come under Specific packaging Shipping Classes.
How To Set Up WooCommerce Shipping Classes?
It’s quick to set up WooCommerce Shipping Classes. Take the following steps if you want to know how shipping groups work and have a good understanding of what goods you want to group:
Step 1: Adding a Shipping Class
Firstly, make sure you install WooCommerce plugin successfully on your WordPress site.
- Navigate to WooCommerce >> Settings
- Click the Shipping tab
- After which click on Shipping class
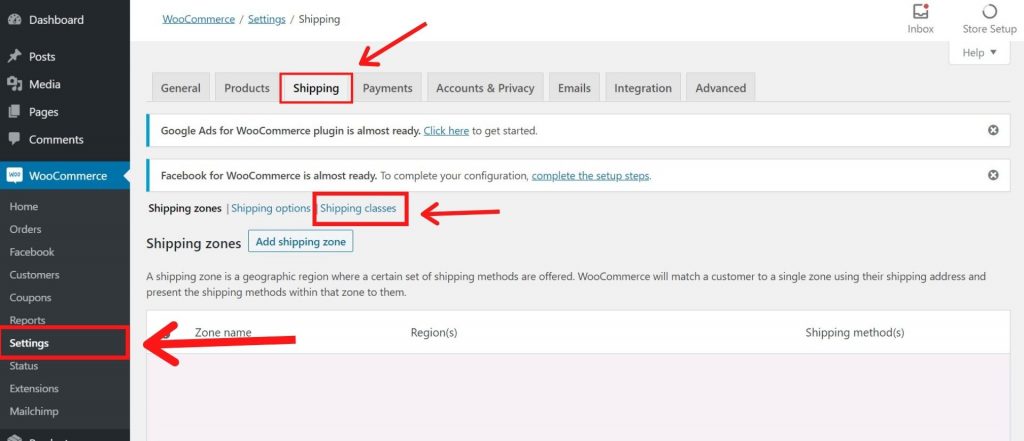
Please go into the same shipping class and also a slug. It will immediately be filled for you as you leave the slug empty. We would also suggest adding a summary to make it easier to understand the class, essentially if several shipping classes are produced.
Repeat the procedure on your shop for each shipping class. Now, let us begin to apply your goods in this shipping class.
Step 2: Enable the shipping class to products
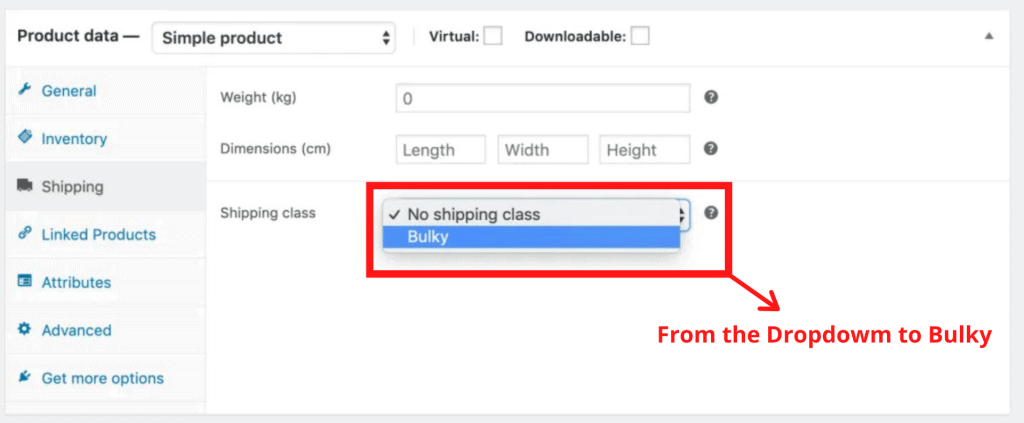
Next, let’s submit a product to this latest shipping class. Update the product and adjust the Shipping Class dropdown to ‘Bulky’ inside the Shipping column.
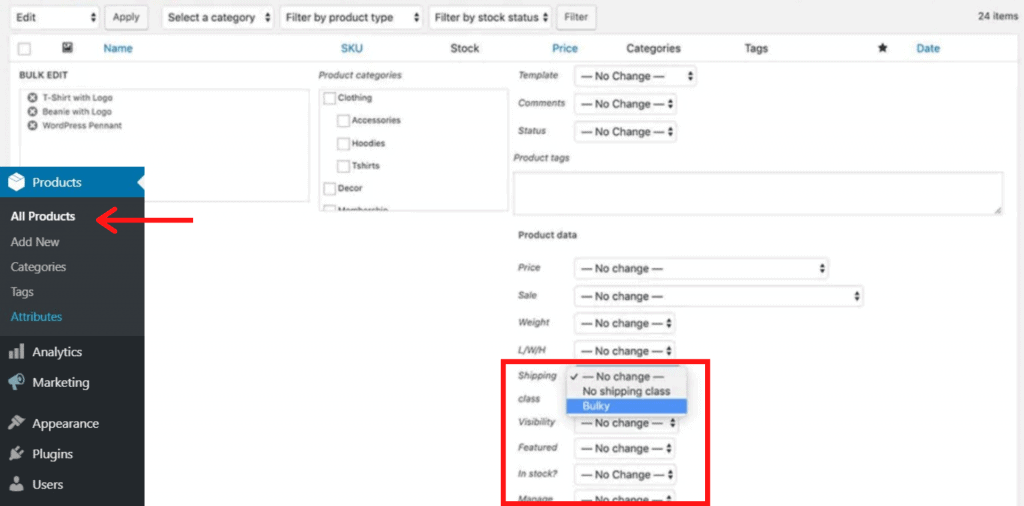
If you want to add this class to several items from the main Products screen, you can do so. Tick what you’d like to apply to the shipping class and select Edit from the top-left drop-down, after which select Apply. Users can then edit the value of the shipping class and save it.
Step 3: Learn to set a rate for WooCommerce Shipping Class
We now need to set the shipping rate after creating a class and applying it for a product. We’ll use flat rates to keep things simple.
- Bulky goods would be shipped at a flat rate of $22
- All else will have a flat rate of $8
Let’s first go through: WooCommerce >> Settings. Now, please click on the Shipping tab. We will edit the delivery area this time. E.g., in the following example, we picked Australia. Click the Edit page, hover over that.
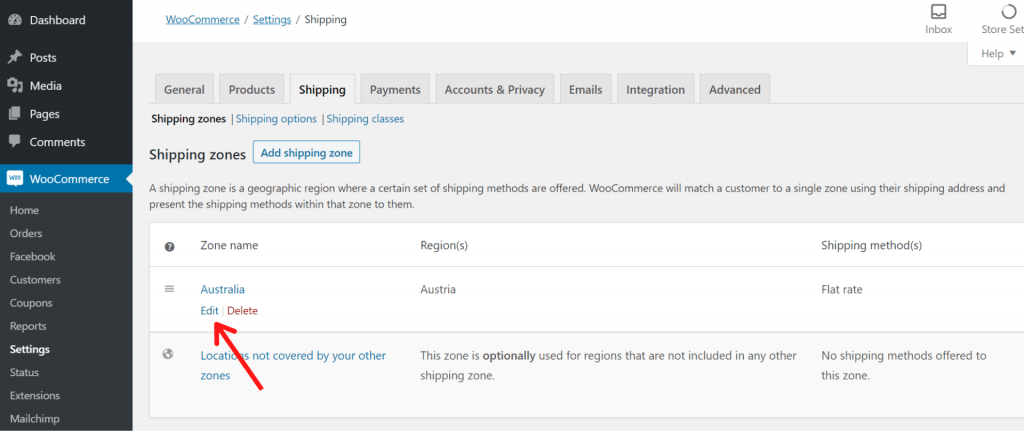
There you’ll see the Shipping Methods. For now, we picked flat rate method.
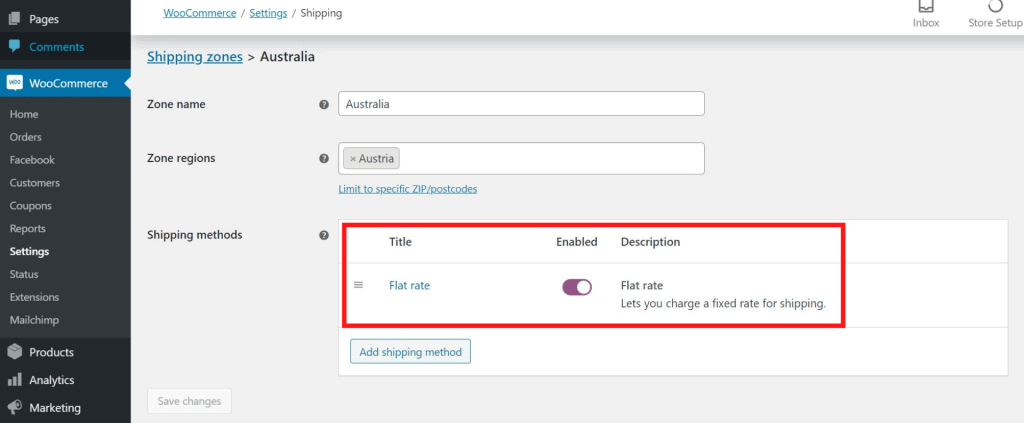
Next to our bulky shipping class here, we can add a price. We shall add 8 to the expense of no shipping class, according to our above prices. The voluminous transport class is 22. Please note that the usual cost is 0. This number would still have to be added to the delivery class’s expense if you adjust it.
You can individually charge shipping for each class under the calculation type. Depending on the most expensive shipping class, you can charge per shipment and charge. Shipping costs will be $22 if chosen as the latter choice.
Yoast SEO – Noindex Shipping Classes
The Yoast SEO and WooCommerce shipping classes are somewhat occasionally considered as taxonomy. It generates a page associated with each shipping class, and Google indexes them by default.
In this situation, you usually do not want those details to be included in your SERP results. You should make sure that Google’s search results are not filtered and are thus deleted with the Yoast SEO plugin.
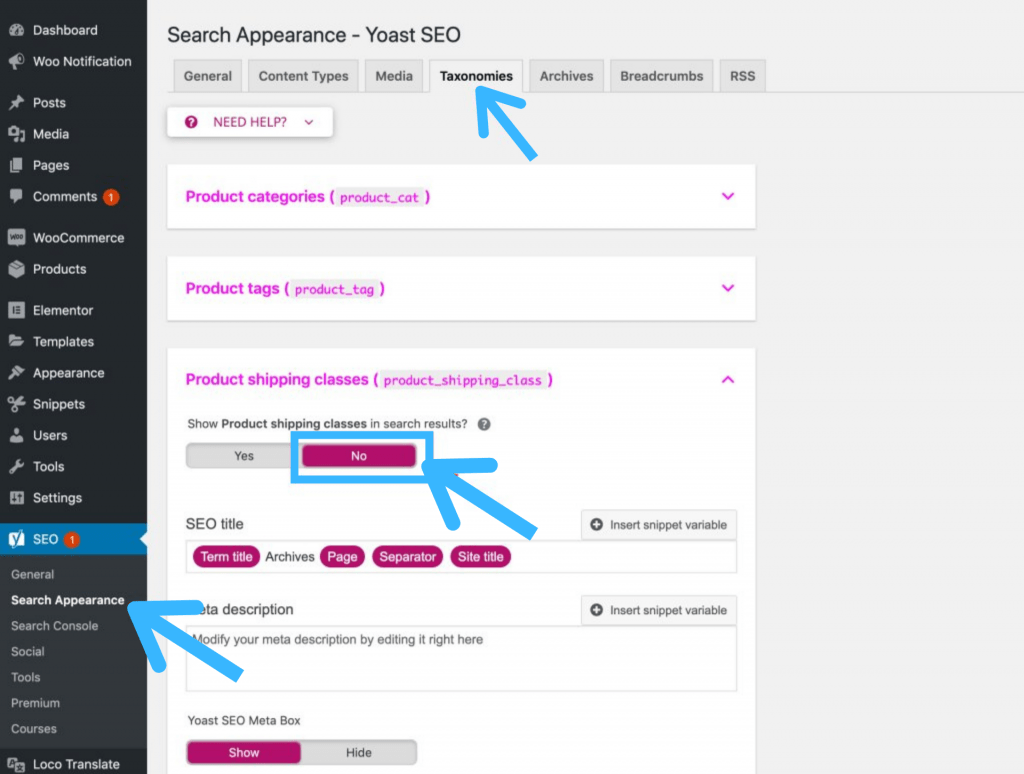
Follow these following steps:
- Navigate to Yoast SEO >> Search Appearance
- Now, Select on the Taxonomies tab
- Finally, click on ‘No’ option. You will find the option under “Show product shipping classes in search results?”
- After that, Save the changes
Different WooCommerce Shipping Plugins
We tried to mention some of the WooCommerce Shipping Plugins that were helpful. You must note that these plugins are not free.
ELEX WooCommerce DHL Express ($79)
Store owners can easily access DHL shipping rates and print DHL shipping labels for DHL Express and DHL eCommerce with the ELEX WooCommerce DHL Shipping Plugin with the Print Label plugin. If that’s your shipping carrier of choice, they even have a variant for USPS too.
WooCommerce Advanced Shipping ($18)
We suggest searching for a WooCommerce Advanced Shipping plugin to build more complex shipping laws depending on requirements. Created by Jeroen Sormani, a Dutch developer, it enables you to create conditional logic around almost any set of rules. With an almost perfect rating of around 500 reviews, the plugin is an excellent blend of great features and outstanding support.
WooCommerce Table Rate Shipping Pro ($69)
Likewise, under a combination of requirements, the WooCommerce Table Cost Shipping Pro plugin will help you set up rules to measure shipping prices. The shipping cost you have specified in that rule is applied if the cart meets the rule’s criteria.
Sum Up
Congratulations, you have finally learned How To Set Up WooCommerce Shipping Classes. Moreover, some of the visitors also asked us about How to Fix Briefly Unavailable for Scheduled Maintenance Error in WordPress. Do check the dedicated article on this.
If you enjoyed this post, subscribe to our WordPress video tutorials on YouTube Channel. Remember to follow us on Twitter and Pinterest too.
We accept any suggestions from the visitors because it always motivates us to improve. Feel free to comment below.
