
PHP is the core server-side language for WordPress. It has been used throughout the CMS to power up its core functionalities, themes, and plugins. It handles dynamic features and tasks like user authentication and database interactions of the platform.
So to keep your WordPress websites running smoothly and securely, you must update the PHP version regularly. Otherwise, your website may miss out on compatibility with the themes, plugins, and many latest features.
This article will explain a step-by-step guide on how to update the PHP version of your WordPress site. Before that, take a quick look at why you should update PHP.
Key Reasons to Update PHP on WordPress Websites
If you are still reluctant to update your PHP version, the following points will surely clear your mind. Give a quick skim through, please.
The updated PHP version comes with improved security patches. They can save your site from potential vulnerabilities, reducing the risk of hacks and data breaches.
Better Performance
New PHP versions usually fix old bugs and technical glitches. This can lead to faster loading time, better user experience, and rigorous stability.
Ensure Compatibility
Updating PHP can make your website compatible with the latest technologies. So your website will seamlessly work with the newest themes, plugins, and applications.
Access to Features
Some WordPress features require specific PHP versions, meaning the new version. So without updating to the new version, you cannot enjoy those features.
Support
You won’t get any support on older versions. And if you do get it, that will be very limited. But will get quick support for the newer versions.
So, now you know the importance of updating the PHP version on WordPress. However, you must check your website’s current PHP version before updating it.
Checking the PHP Version of Your Website
You can check the current PHP version of your WordPress site in several ways. We’ll show you two methods here.
Method One: From Your WordPress Dashboard
Go to your WordPress Dashboard and navigate to Toos > Site Health. Then click on the Info tab.

Now scroll a bit and click on the ‘Server’ section. And you’ll see the PHP version there.

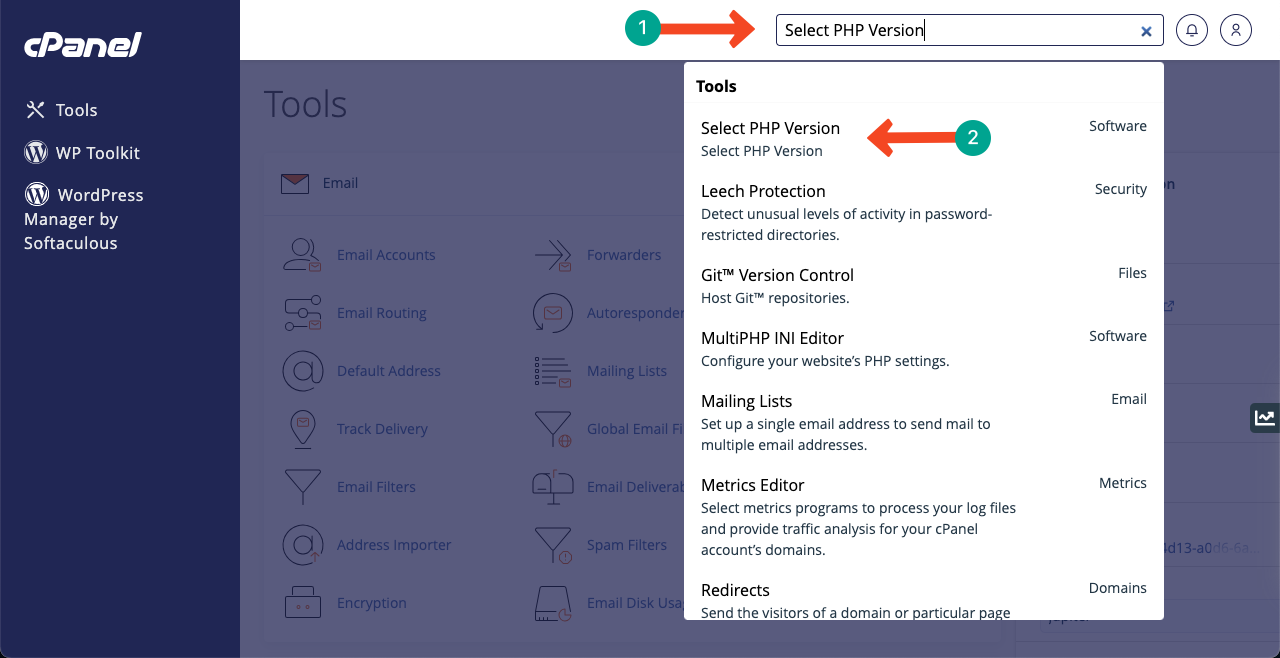
Method Two: Using the cPanel
Read MoreLog into your cPanel using the username and password provided by the hosting provider.
Type Select PHP Version in the top search bar. You’ll get an option appearing below with the same name. Click on it.
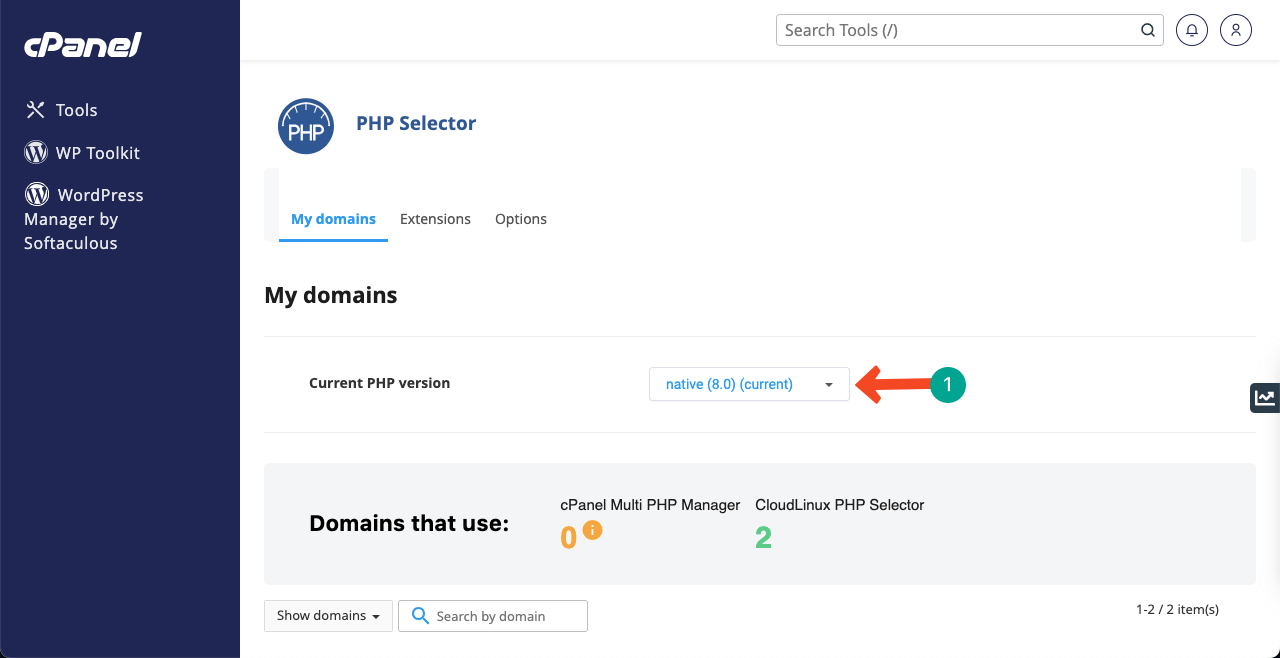
A new page will open. You’ll see the PHP version of your WordPress site next to the option Current PHP Version.
Method Three: Using the Display PHP Plugin
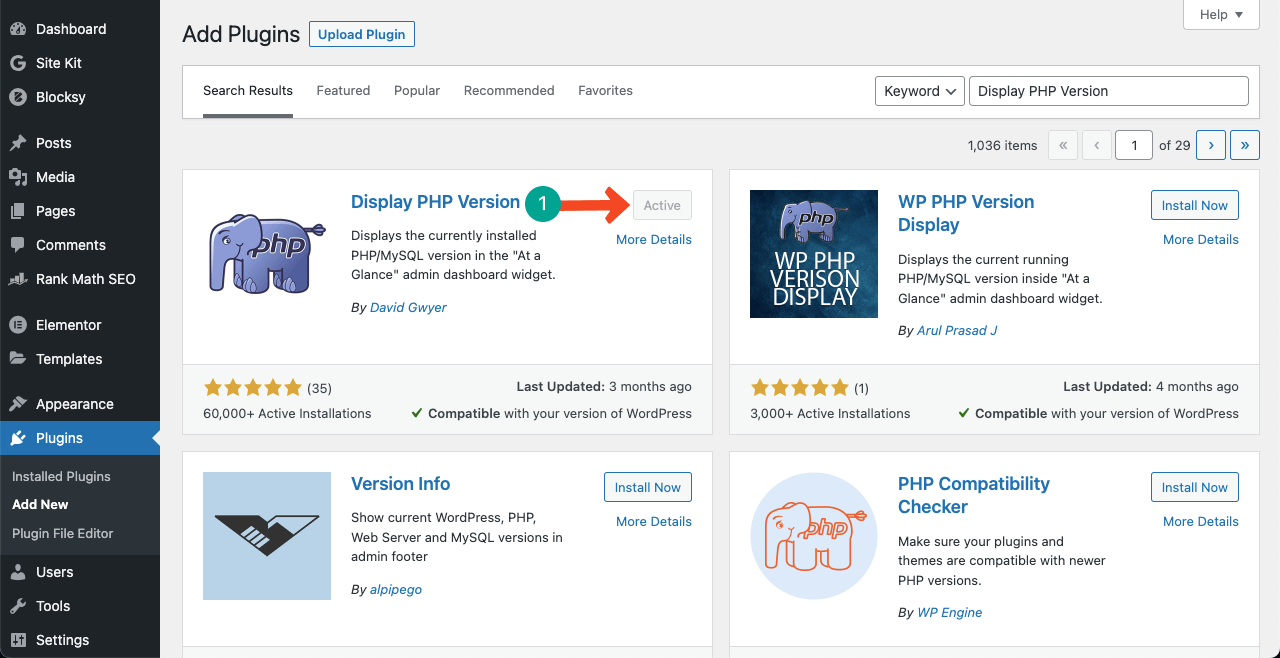
Get into your WordPress dashboard again. Navigate to Plugins > Add New. Install and Activate the Display PHP Version plugin.
Come to the dashboard. Go to the At a Glance section. You’ll see the current PHP version on it.
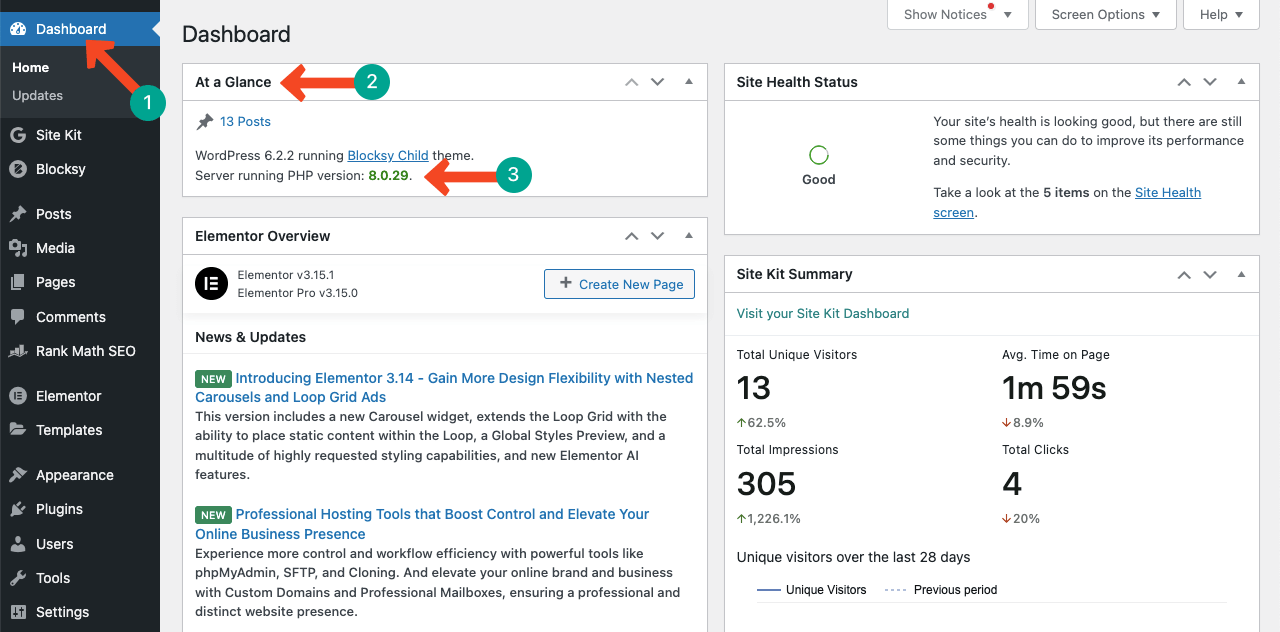
Thus you can easily trace the PHP version of your WordPress website.
show lessUpdating the PHP Version of Your WordPress Site
Although your current PHP version may be fine, you must update to the new version whenever it’s launched for better service. But the updating process often causes some accidents, for why we must take some precautions.
Step 01: Keep a Backup of Your Website
There are numerous backup plugins online. You can keep a backup of your entire site using any of them. You can instantly recover your site from the back files in case of any accidents.
We aren’t showing you the process here. Just take a look at the link – how to back up a WordPress site. Plus, many hosting providers also keep weekly or monthly backups. You may use those files as well from the cPanel.
Step 02: Run a Compatibility Check
You must run a compatibility check. It will help you evaluate if your installed and activated themes, plugins, and codes are ready to adopt the updated version. If there exist any compatible codes and you still try to update to the new PHP version, your entire website will surely crash.
Go to Plugins > Add New. Install and activate the PHP Compatibility Checker plugin.
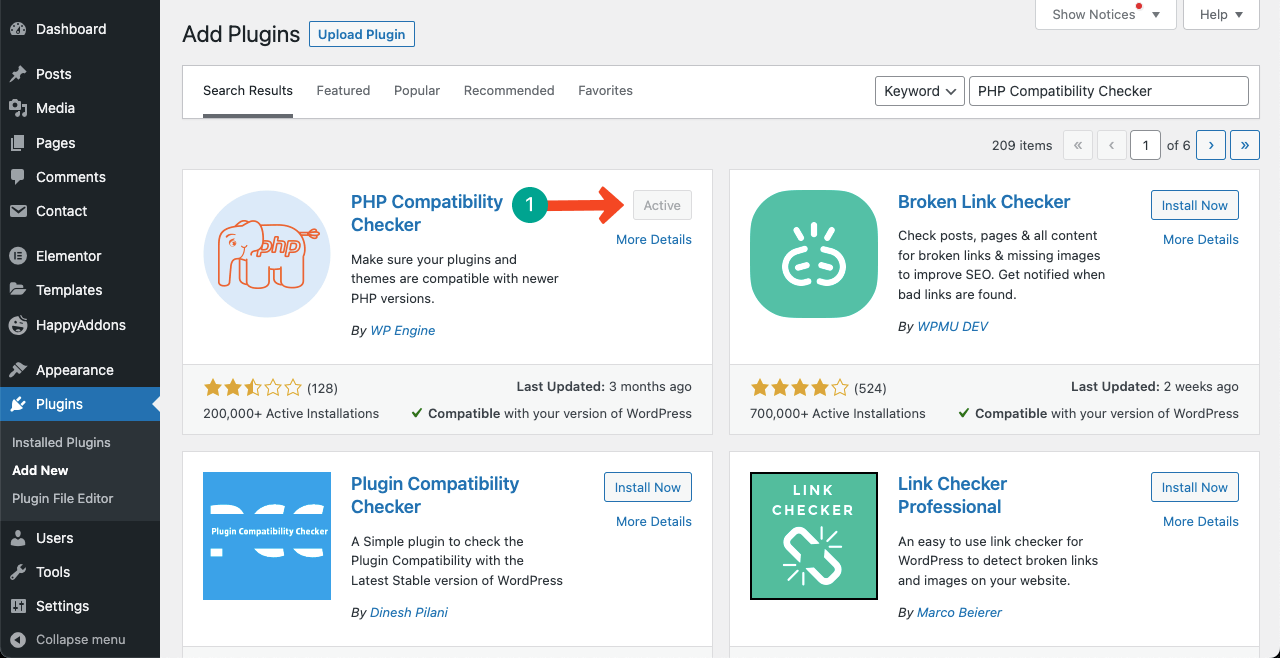
Now, navigate to Tools > PHP Compatibility. You may decide to scan only the active plugins and themes or all the installed plugins and themes. Whatever option you select, press the Scan Site button at the end.

Below you can see some errors for why these codes or plugin functions aren’t compatible with the new PHP version.

You must fix them before starting the updating process. This plugin provides some viable recommendations so you can solve these problems. Hope you can do them yourself. If not, take professionals’ help.
Step 03: Upgrade the PHP Version
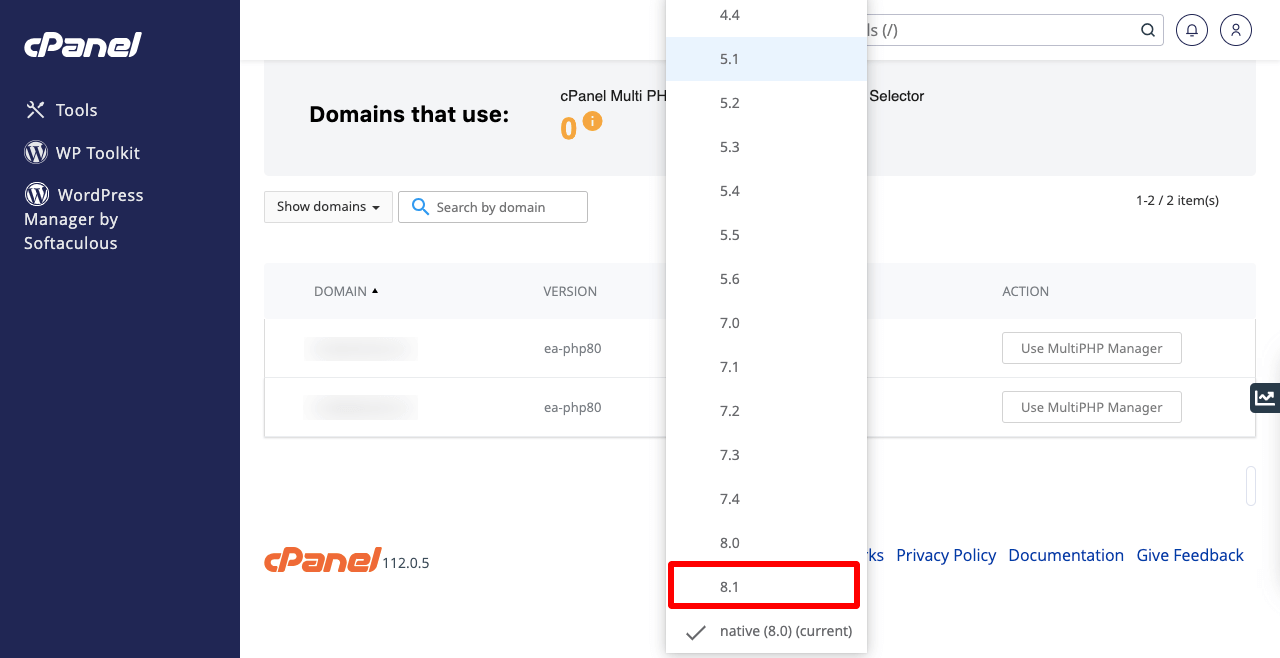
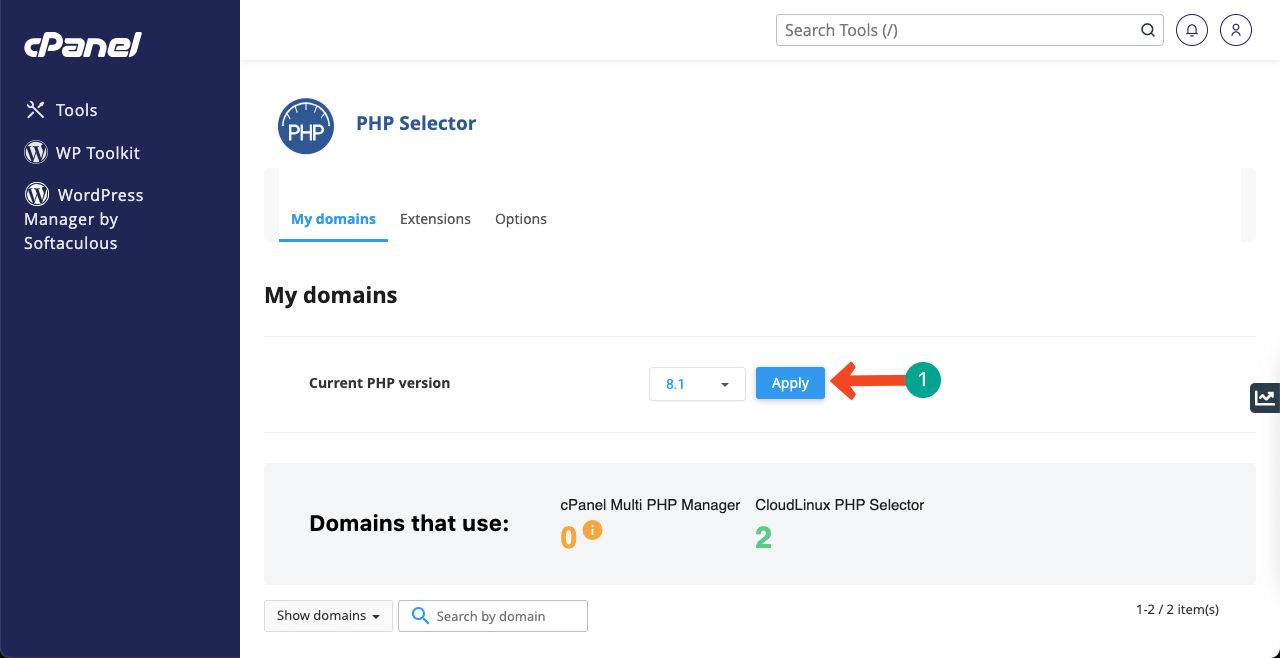
Log into your cPanel and go to the page Select PHP Version again. Press the dropdown icon we have pointed to in the below image.
We can see 8.1 is the latest version. Select this version by clicking with your cursor.
Hit the Apply button at the end. This will complete the updating process.
Step 04: Check Your Website
This is the last step of the process. Once the update completes, go to your website and explore all its pages and functions. If the website design and all the functions work well, then there is no reason to worry.
But if something goes wrong or crashes, recover it from the backup, solve the error, and run the updating process again.
Final Words!
Any technical process usually has some complications and risks involved. But due to this, you can’t stay away from adopting the latest technology. Updating the PHP version will also involve some complications and risks.
However, WordPress has updated itself a lot over time. These complications have been reduced a lot. As a result, even if you are a new user, it will take you only a few hours or one-two days to get master these complexities management.
Hope you have benefited from this article. If you have any new questions related to the PHP update, please let us know in the comment box.
Leave a Reply